Mastering Trip Planning with Google My Maps
Discover how to seamlessly plan your next adventure using Google My Maps. Whether you’re an avid traveler or a meticulous planner, this tool will revolutionize the way you organize your trips. Say goodbye to the days of paper maps and handwritten itineraries!
Planning a trip can be both exciting and overwhelming. With countless destinations, accommodations, and attractions to consider, keeping everything organized is a daunting task. Fortunately, Google My Maps offers a powerful solution to streamline your travel planning process.
“With Google My Maps, not only can you plot your destinations, but you can also customize your routes, add notes, and share your plans effortlessly.” – TechRadar
In this comprehensive guide, we’ll walk you through:
- Creating and customizing your map
- Adding and organizing destinations
- Optimizing routes
- Sharing your travel plans
By the end of this guide, you’ll be equipped with all the knowledge you need to make the most of Google My Maps, ensuring your next trip is perfectly planned and stress-free.
Step-by-Step Guide to Using Google My Maps
1. Create and Name Your Map
To get started, head to Google My Maps and log in with your Google account. Click on the “Create a new map” button. Name your map by clicking on “Untitled map” at the top and entering a descriptive title, such as “Italy Vacation 2024”.

2. Add Pins for Your Destinations
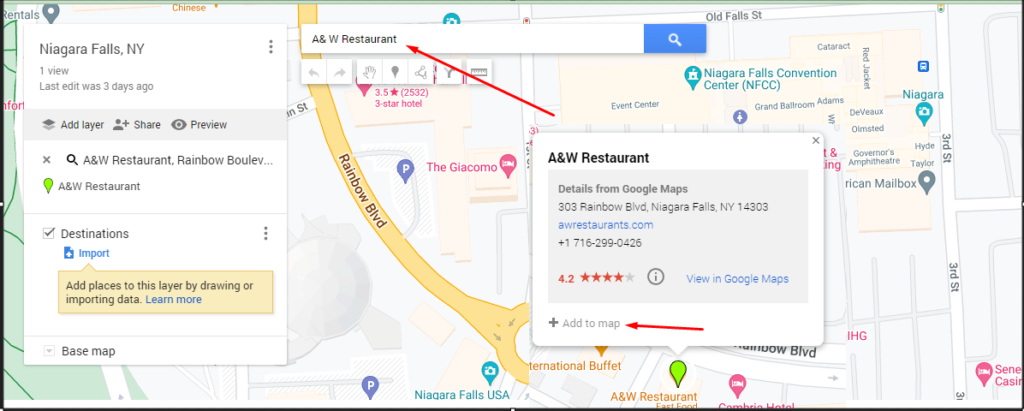
Use the search bar or manually drop pins by clicking the pin icon. This allows you to mark your destinations on the map. For each pin, you can add a name, description, and photos. For instance, you might add a pin for the A& W Restaurant and include a brief history and your planned visit time.


3. Customize Your Map
Click on each pin to customize it. Change the color and icon of the pins, add detailed descriptions, and upload photos. This personalization makes your map more informative and visually appealing. For instance, use a green pin for parks and a blue pin for water-related activities.


4. Add Directions and Routes
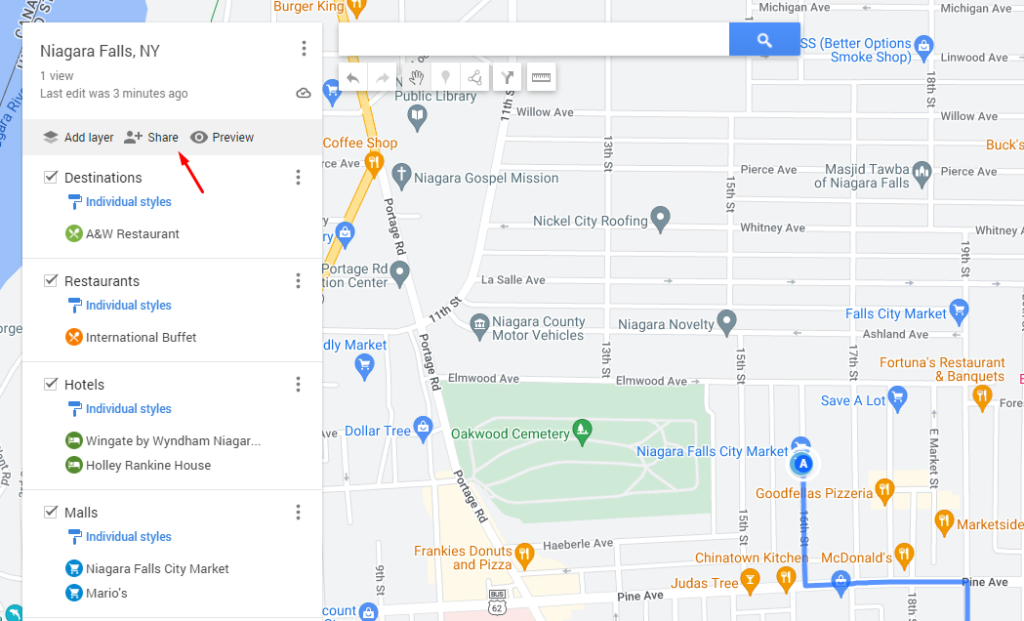
To add routes, click the “Directions” button and choose your mode of transportation (walking, driving, biking). Connect your destinations to create an optimized route for your trip. For example, you can plan a walking tour of Niagara Falls city market, connecting the Valero Food and Gas Mart.


5. Share Your Map
Once your map is complete, share it with friends or travel companions. Click the “Share” button to generate a shareable link or invite others via email. Adjust the sharing settings to control who can view or edit the map.


Tip: Use the sharing options to allow others to view or edit your map. This is especially useful for collaborative trip planning. You can work together to add new destinations or refine routes.
Additional Tips for Using Google My Maps
- Offline Access: Save your maps for offline use to ensure you can access them without internet connectivity. This is particularly useful when traveling to areas with limited internet access.
- Embed Maps: If you have a travel blog, embed your Google My Maps directly into your posts to share your itinerary with readers. This interactive element can enhance your content and provide more value to your audience.
- Explore Layers: Use different layers to separate various aspects of your trip, such as daily itineraries, specific regions, or types of activities. This organizational feature makes your map cleaner and more navigable.
With these steps and tips, you are ready to plan your next adventure efficiently and creatively using Google My Maps. Happy travels!


